How to set up staff logins, roles and permissions
Last updated: September 23, 2026
This guide explains how to control what your staff can see and do in the VenueSumo back office. It covers creating logins, customising access for a whole role or for one person, and the system-wide settings that apply to every login of a certain type.
How permissions work
Every staff member has a login, and every login has a login type (e.g. Manager, Supervisor). Each login type comes with a default set of permissions, called roles. VenueSumo has over 190 of these, covering every area of the back office.
You can customise access in two ways:
Option 1: Role-based | Option 2: Login-based | |
|---|---|---|
How it works | Change what a login type can access. Every staff member with that login type gets the change. | Change access for one staff member without affecting anyone else. |
Best for | Tier-based staffing where everyone at the same level needs the same access | Staff with varied or complex needs, where two people at the same level need different access |
Where | Settings > Roles | Settings > Logins |
You can use both options at once, e.g. Option 1 for gate staff and Option 2 for departments that need individual control.
⚠ Global Configuration settings sit above both options. Some sensitive permissions, such as amending past bookings, are set for an entire login type and can't be changed for one person. See Global Configuration permissions below.
Login types and default access
VenueSumo has a fixed set of login types. You can't create new ones, except Report Roles (see below).
Section / Feature | Administrator | Venue Manager | Senior Manager | Manager | Supervisor | Operator |
|---|---|---|---|---|---|---|
Dashboard | ✅ | ✅ | ✅ | ✅ | ✅ | |
Dashboard / QuickLinks > Create new handover note | ✅ | ✅ | ✅ | |||
Dashboard / Venue Summary widget | ✅ | ✅ | ✅ | |||
Orders | ✅ | ✅ | ✅ | ✅ | ✅ | |
Orders / New Orders | ✅ | ✅ | ✅ | ✅ | ✅ | |
Orders / Bookings | ✅ | ✅ | ✅ | ✅ | ✅ | |
Orders / Bookings / Availability | ✅ | ✅ | ✅ | |||
Orders / Bookings / Blocked Capacity | ✅ | ✅ | ✅ | |||
Customers / Members | ✅ | ✅ | ✅ | ✅ | ✅ | |
Operations | ✅ | ✅ | ✅ | |||
Operations / Products | ✅ | ✅ | ✅ | |||
Operations / Facilities | ✅ | ✅ | ✅ | |||
Operations / POS Facilities | ✅ | ✅ | ✅ | |||
Operations / Events | ✅ | ✅ | ✅ | |||
Reports | ✅ | ✅ | ✅ | ✅ | ✅ | |
Stock | ✅ | ✅ | ✅ | ✅ | ✅ | |
Forms | ✅ | |||||
Settings | ✅ |
Administrator has access to everything, and its access can't be changed.
POS Operator is for floor and gate staff. Most of your staff will only need a POS Operator login with a PIN.
POS Terminal is a separate login for each POS device, used to log in to the POS Facilities you've set up. Staff then use their PIN at that terminal, so their actions are logged against them.
Create a login
Go to Settings > Logins.
Click + New Login.
Enter the staff member's name, email and a temporary password. Ask them to reset it the first time they log in.
Choose a Login Type. The default permissions for that type are applied automatically.
(Optional) To customise this person's access, see Option 2.
Issue a PIN if they need POS access.
Click Save. Access is live immediately.
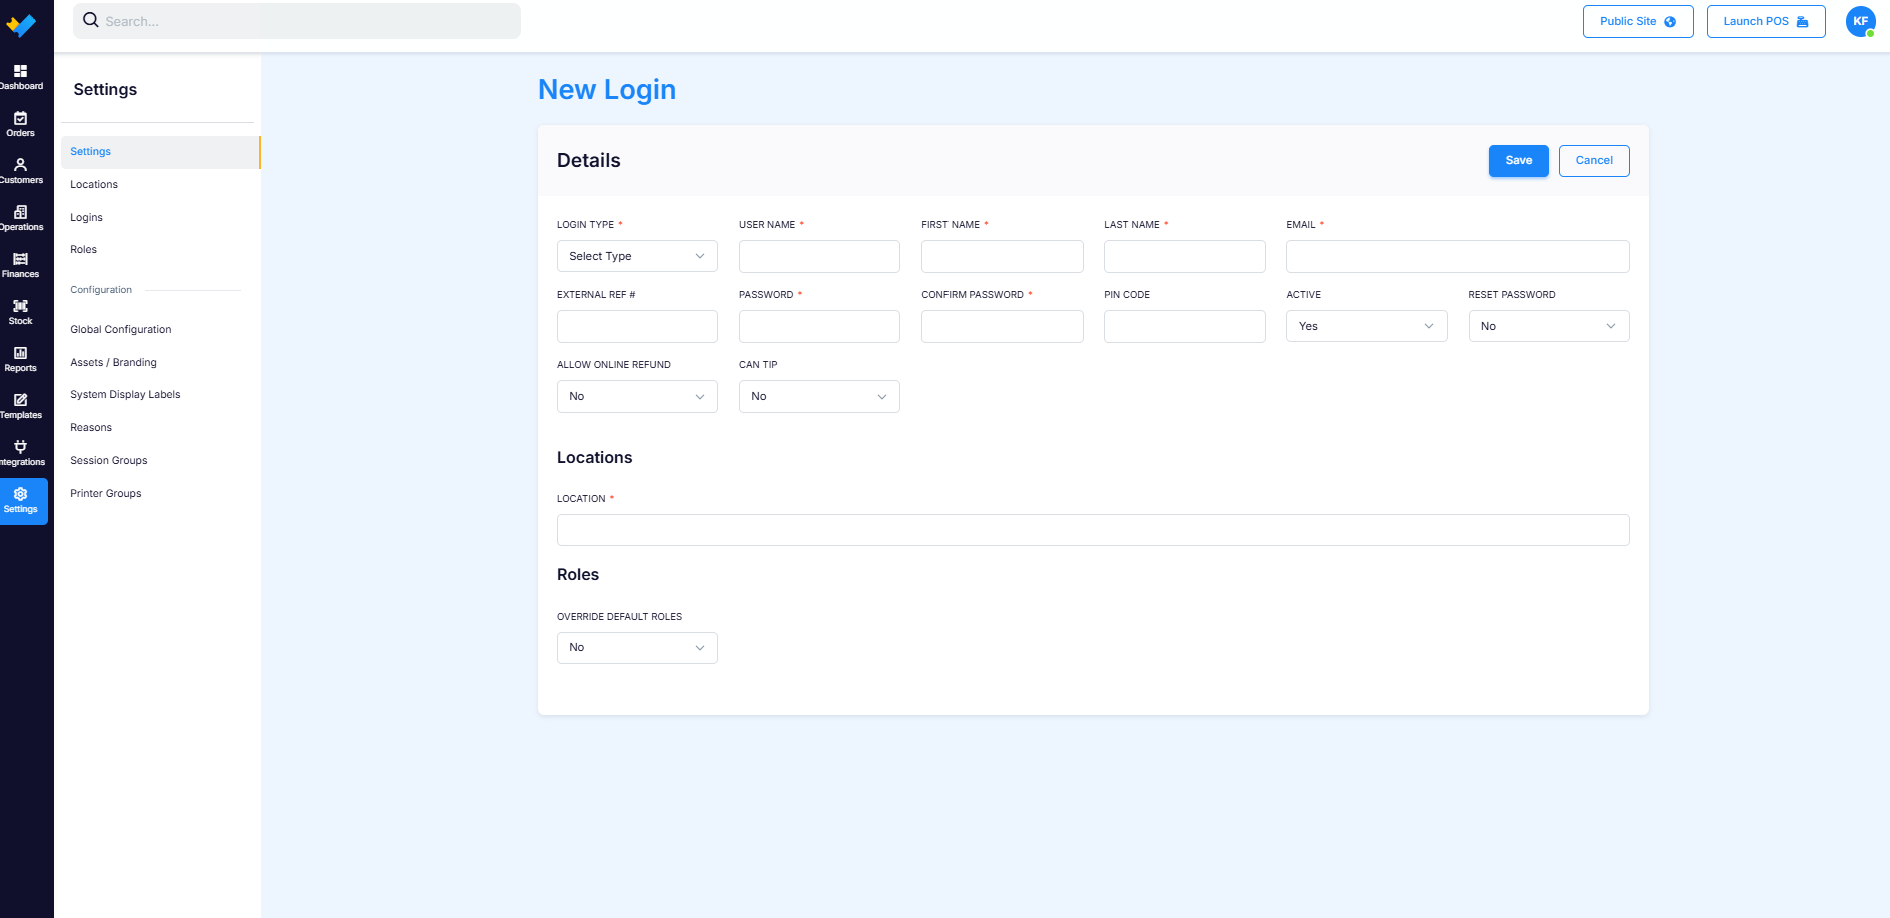
💡 You can only create logins for login types lower than your own.
Option 1: Customise access for a whole login type
Use this when everyone at the same level should have the same access.
View roles
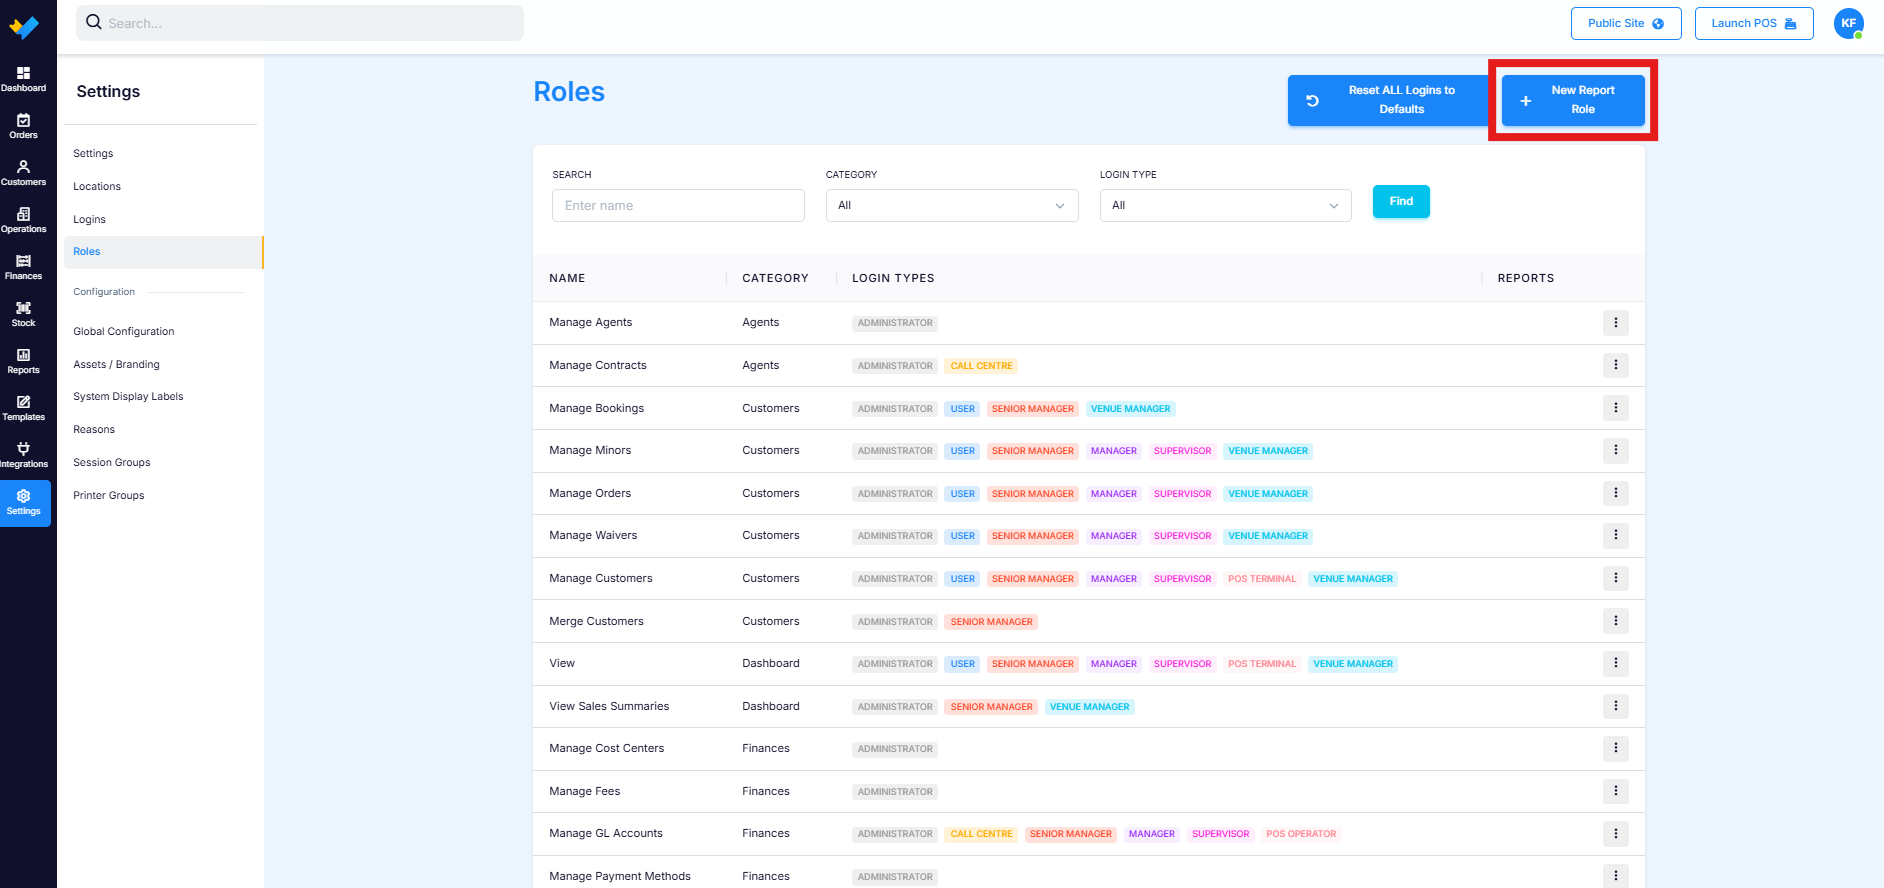
Go to Settings > Roles.
You'll see every role and the login types that have access to it. You can search by role name, category or login type, and page through the list.
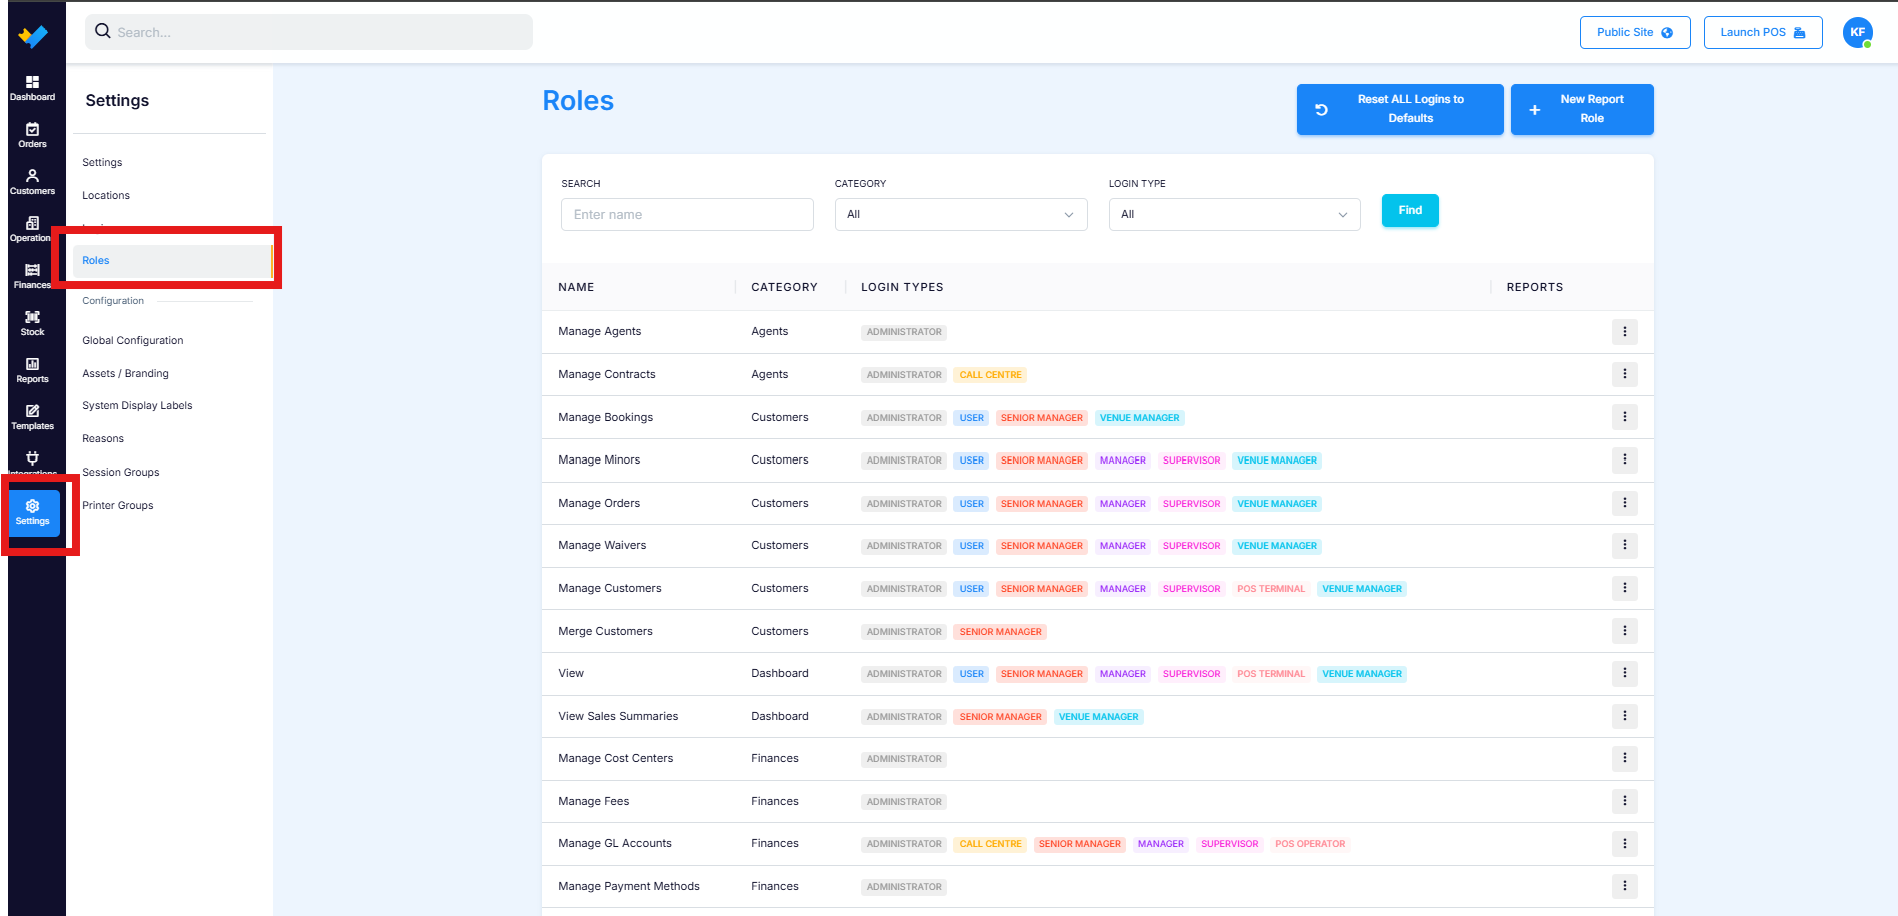
Edit a role
Click the role's row. A panel opens showing which login types have access.
Add or remove login types.
Click Save to apply the change, or Cancel to close without saving.
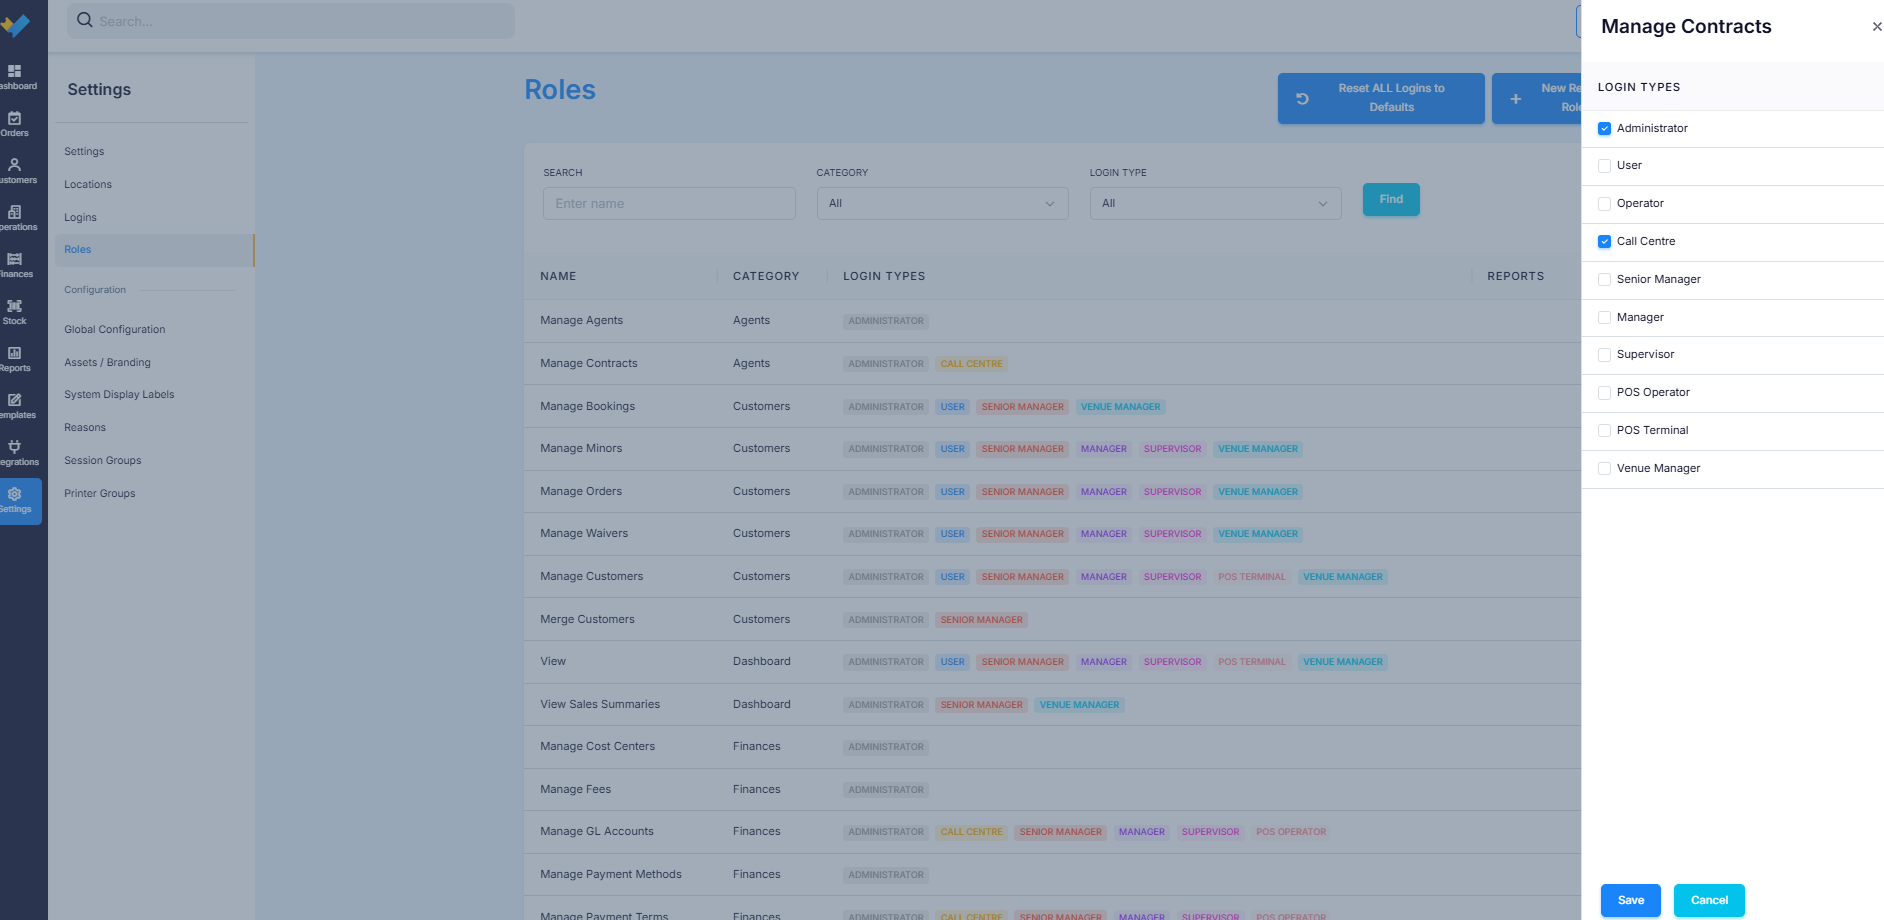
The change applies immediately to every staff member with that login type. Ask one of them to refresh or log out and back in to confirm.
Option 2: Customise access for one staff member
Use this when two people with the same login type need different access.
Go to Settings > Logins and click the staff member's name, or create a new login.
Choose the closest matching Login Type and save.
Set Override Default Roles to Yes. The full list of permissions appears.
Use the Login Type drop-down to move between permission categories: Customers, Dashboard, Forms, General, Operations, Orders, Reports, Settings and Stock.
Tick or untick permissions as needed.
Click Save, then ask the staff member to log in and check their access.
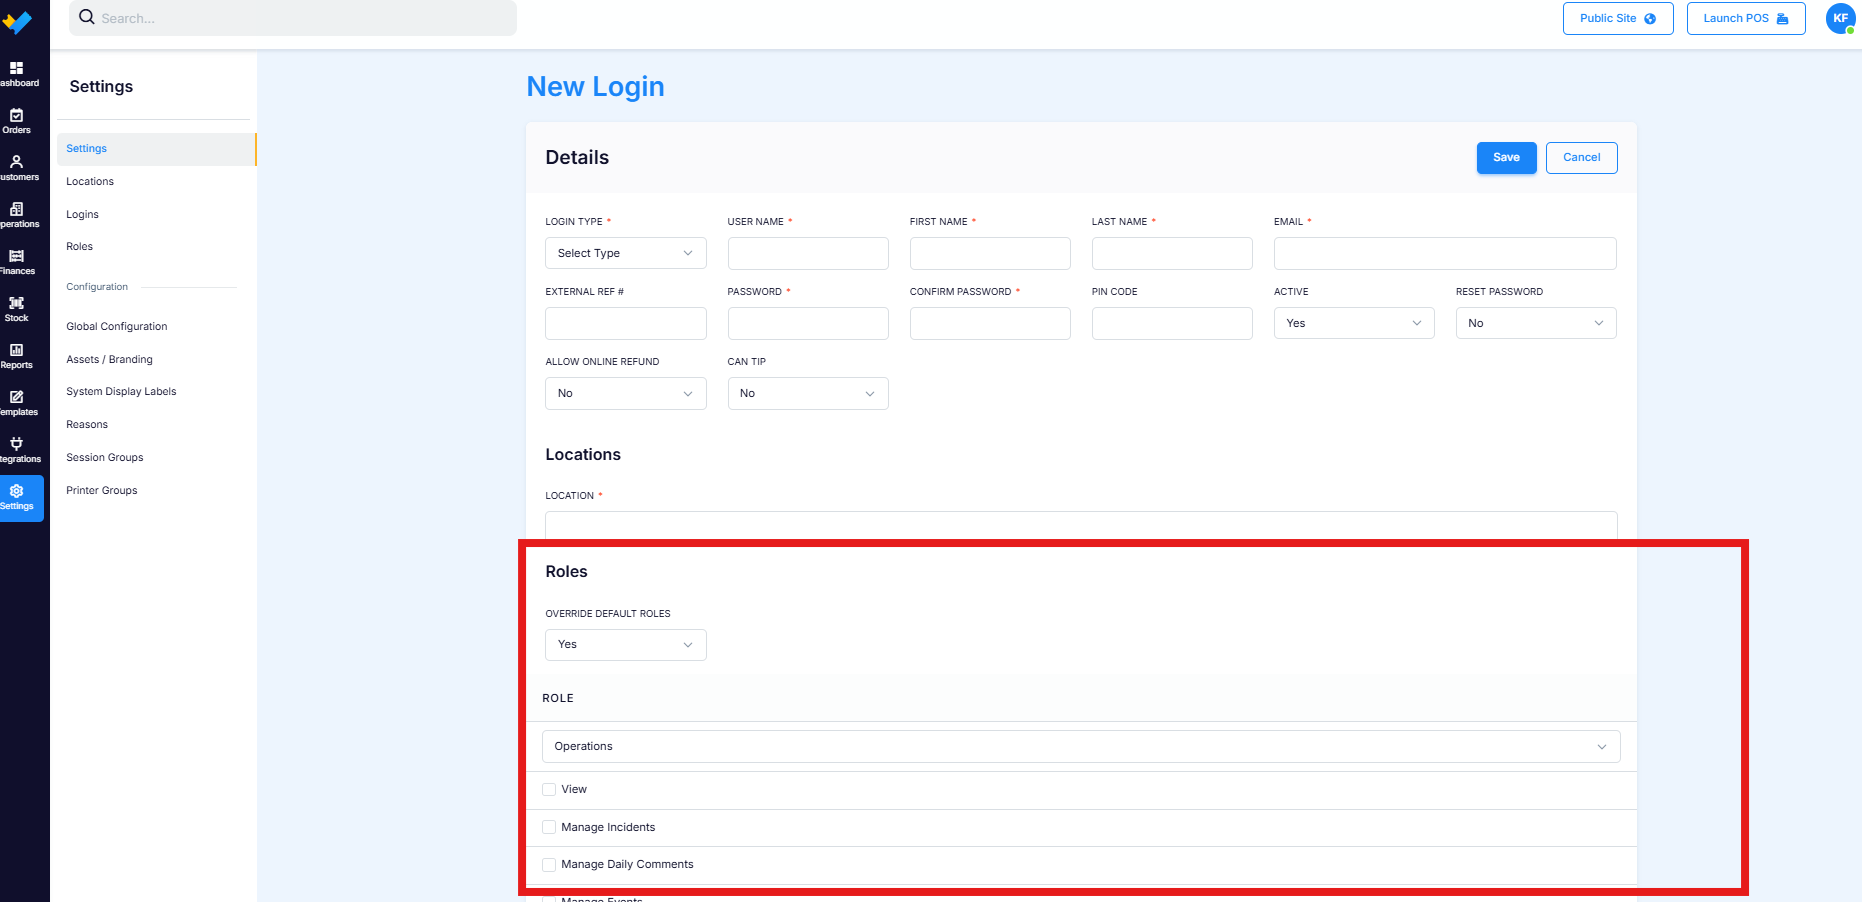
💡 To undo individual changes, set Override Default Roles back to No and save. The login resets to the default permissions for its login type.
Keep a Permissions Register
If you use Option 2, keep a simple internal register so new staff get consistent access. Here's an example:
Department | Login type | Key access enabled | Key access disabled |
|---|---|---|---|
Finance | Administrator | Full access, refunds, past amendments, reporting | N/A (review Global Configuration carefully) |
Sales | Senior Manager | Bookings, agents, contracts, availability | Settings, Forms |
Marketing | Senior Manager | Operations, products, facilities, events, templates | Settings |
Duty Managers / Shift Leads | Manager | Orders, reports, day/date management, login management | Settings, Forms |
Gate Staff | Supervisor | Cash reconciliation, EFTPOS/cash refunds, discounts | Settings, Forms, Operations |
Executives | Administrator | Full access | N/A |
Store it somewhere only Administrators can access, and review it regularly.
When onboarding a new staff member under Option 2:
Identify their department and level.
Find the agreed access for that department in your register.
Create their login, choose the login type and set Override Default Roles to Yes.
Set their permissions to match the register, save and check with the staff member.
Update the register if you agreed any changes.
Report Roles
Report Roles are the one type of role you can create yourself. They control which reports each login type can see.
To create one: go to Settings > Roles and click New Report Role in the top right-hand corner.
To edit one: click the report role's row. You can change its name, the login types it applies to and which reports it includes. You can also filter reports by category.
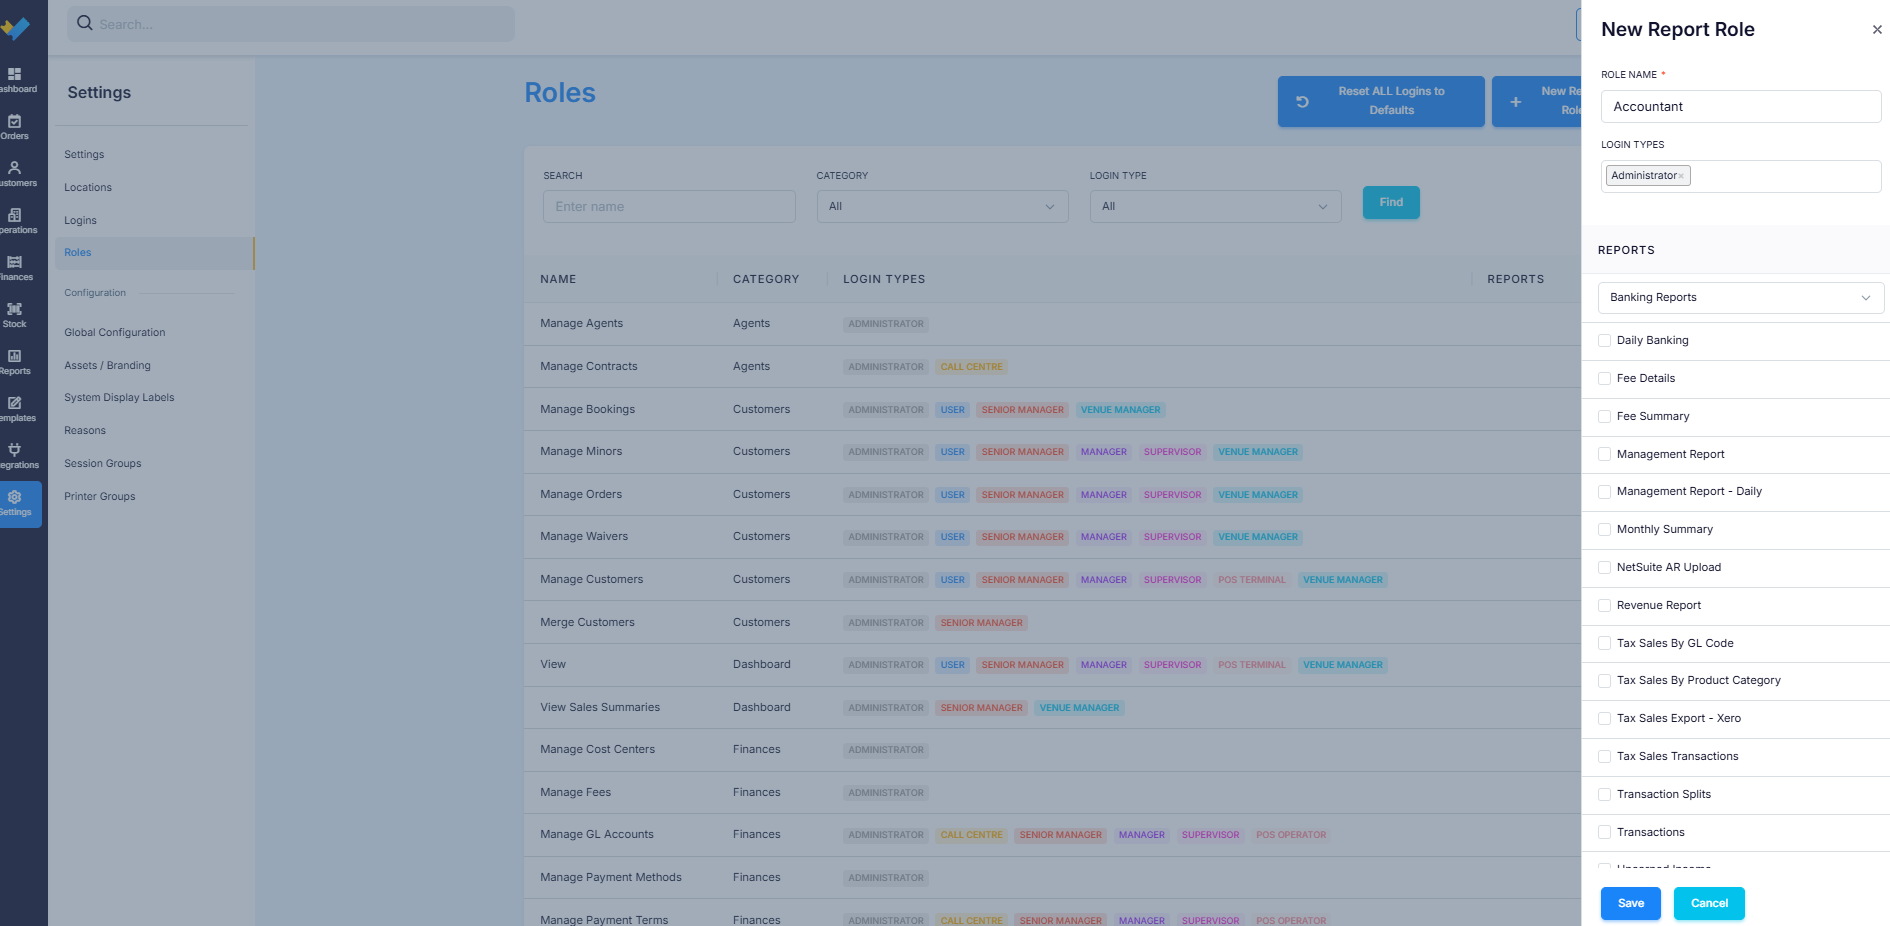
Click Save to apply the change, or Cancel to close without saving.
Global Configuration permissions
Some sensitive permissions are set in Settings > Global Configuration and apply to an entire login type. If you add a login type to one of these fields, every login of that type gains that ability, including logins created later. You can't remove it for one person without removing it for the whole login type.
Permission | What it allows |
|---|---|
Amend Past Bookings / Transactions | Change records from past dates |
Create FOC Bookings/Orders | Put through free-of-charge (complimentary) orders |
Discounting / Price Overrides | Apply discounts and override prices |
Voucher Expiry/Usage | Change a voucher's expiry date or redemption quantity |
To change one:
Go to Settings > Global Configuration.
Find the permission field. It shows which login types currently have access.
Add a login type to grant access, or remove it to restrict access.
Click Save. The change takes effect immediately, so test with a login of the affected type.
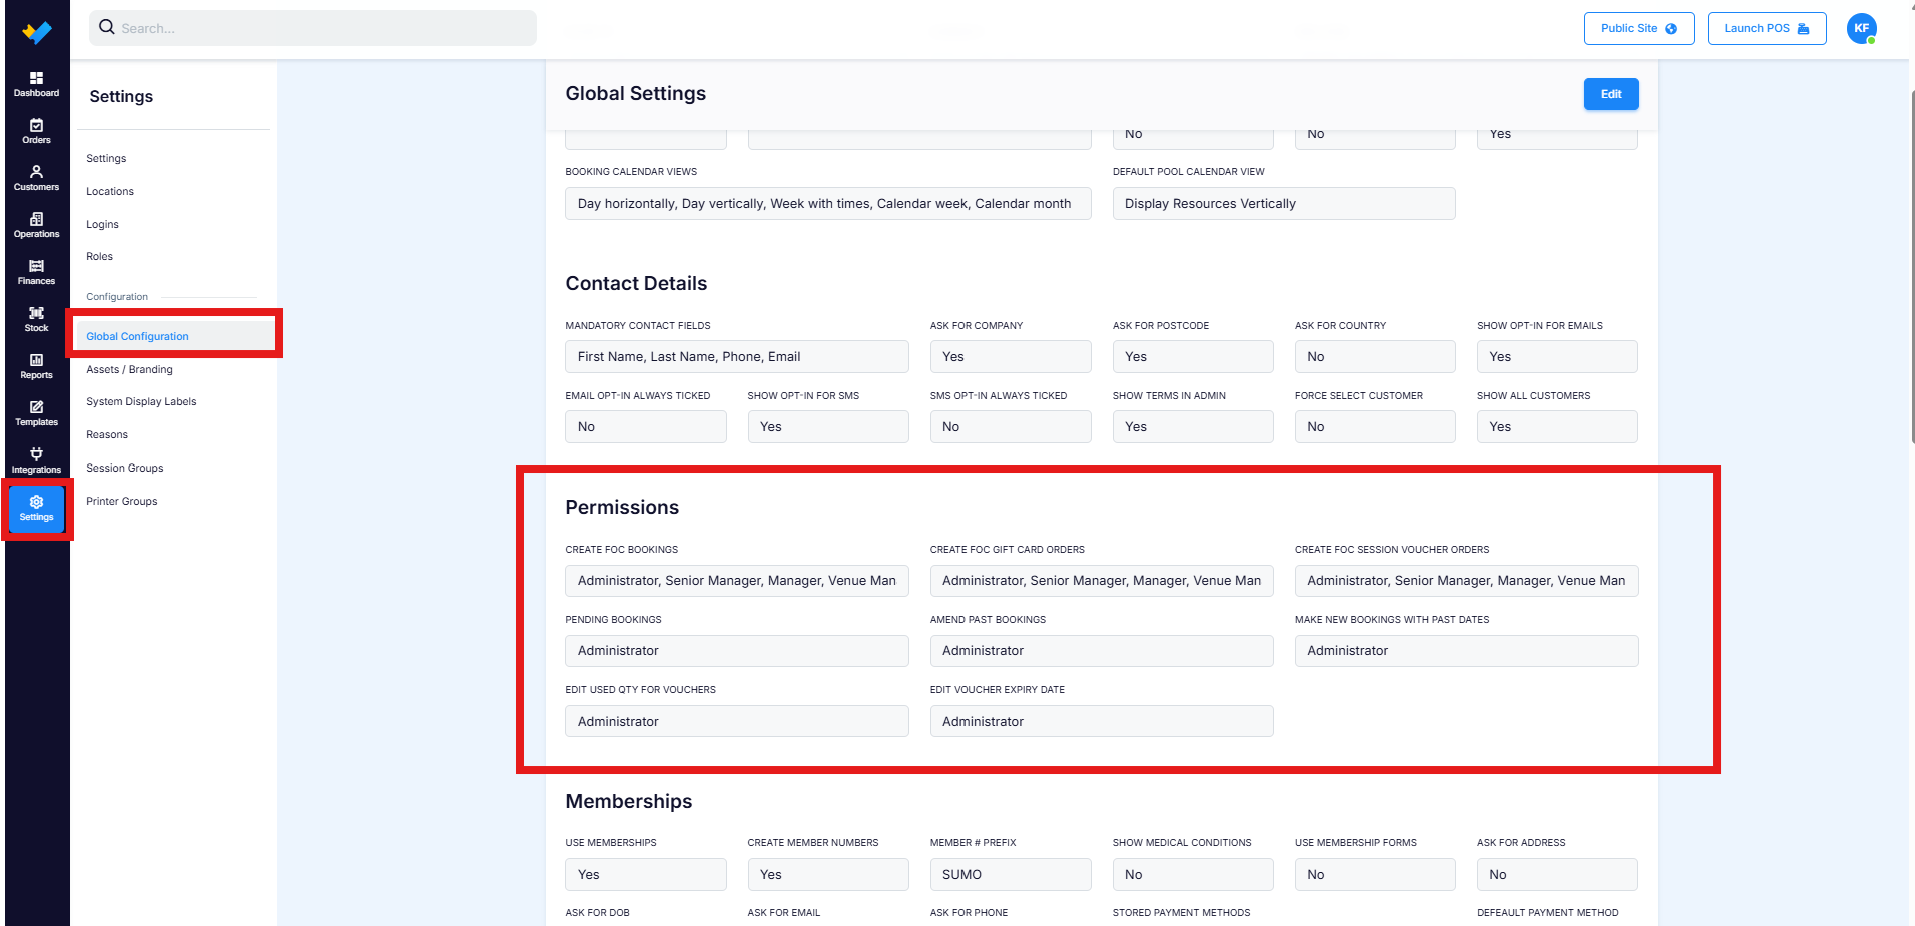
⚠ For example, adding Supervisor to Amend Past Bookings gives that ability to every Supervisor. If only one person needs a Global Configuration permission, give that person a higher login type instead of adding a whole login type to the field.
Online refund permission
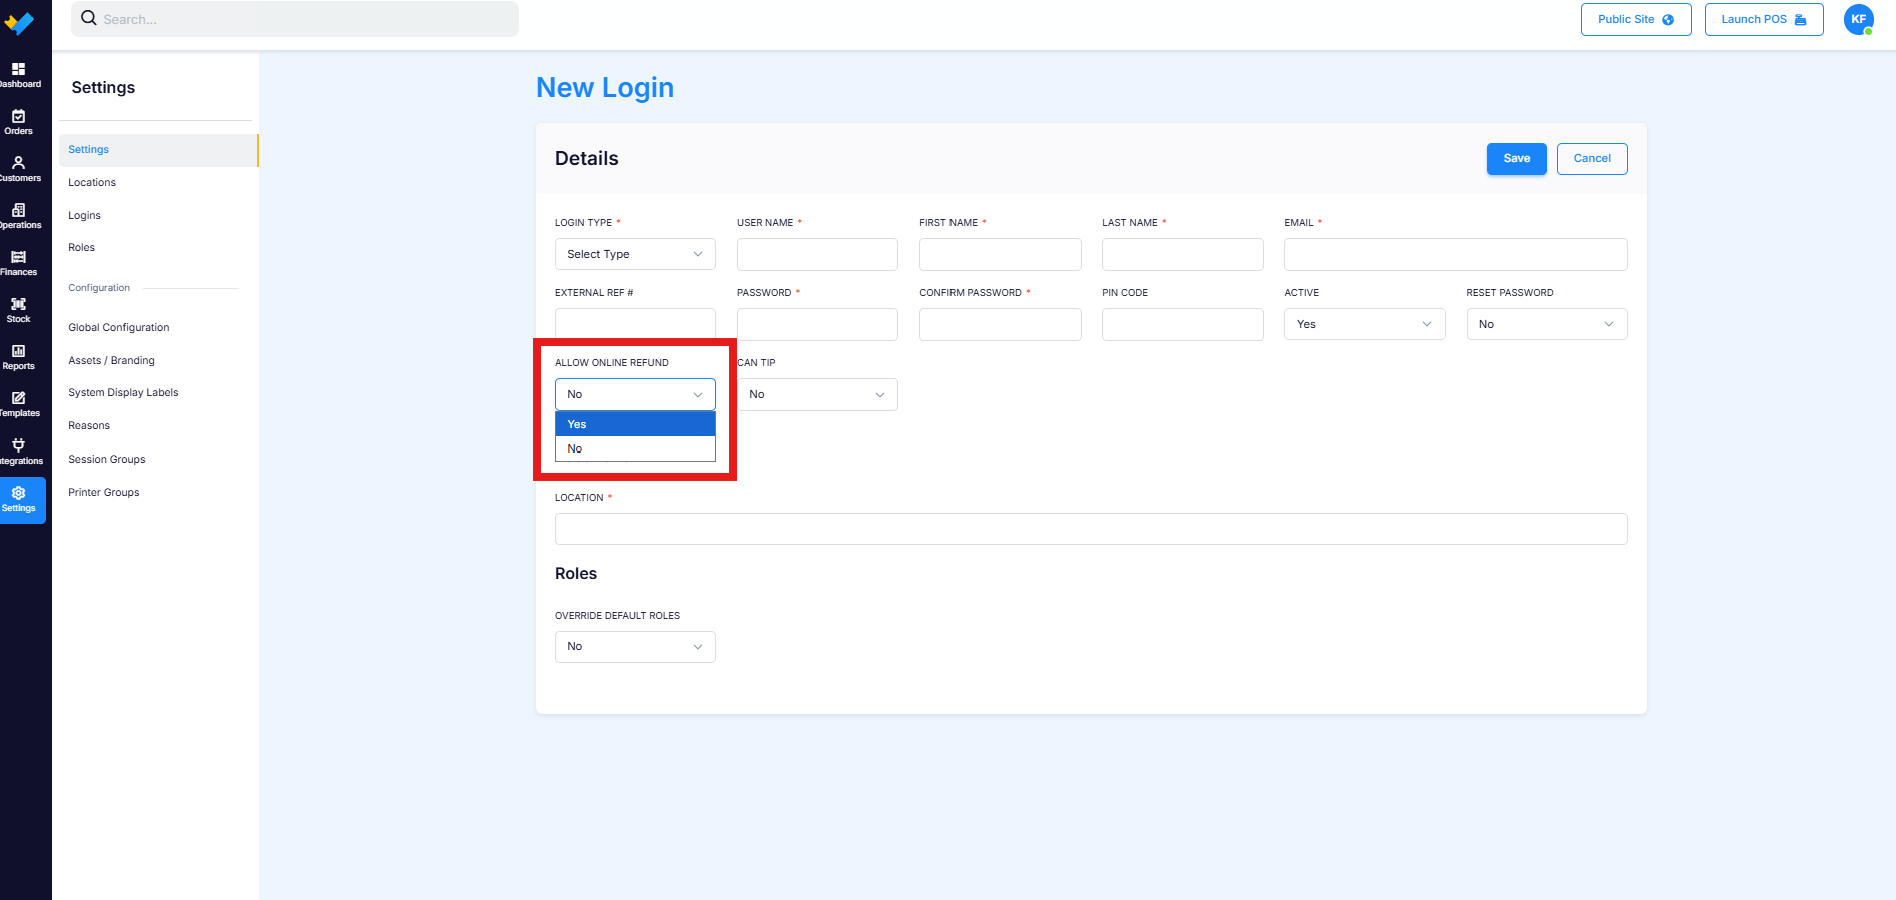
Permission to refund online payments is set separately for each login. It covers payments made through your online booking site, payment links and live payment links. It doesn't cover EFTPOS or cash refunds.
Go to Settings > Logins and open the staff member's login.
In the Details section, find Allow Online Refund.
Set it to Yes to allow online refunds, or No to block them. If you're unsure, choose No.
Click Save. The change is immediate, so let the staff member know.
FAQs
A staff member can't see something they need. How do I fix it?
If you use Option 1, go to Settings > Roles and add their login type to the role. If you use Option 2, go to Settings > Logins, open their login, set Override Default Roles to Yes and tick the missing permission.
Can I give one person extra access without changing everyone else's?
Yes. Use Option 2 and set Override Default Roles to Yes on their login. The exception is Global Configuration permissions, which can't be set per person.
Can I give one person a Global Configuration permission only?
No. These apply to the whole login type. The workaround is to give that person a higher login type.
Can I create a new login type?
No. You can only create Report Roles. All other customisation happens within the existing login types.